Bones
Bones are used for most animation in Spine, even for skeletons that are objects rather then characters. Simple skeletons may use one bone per image. More complex skeletons may bind images to multiple bones so the images deform as the bones are animated.
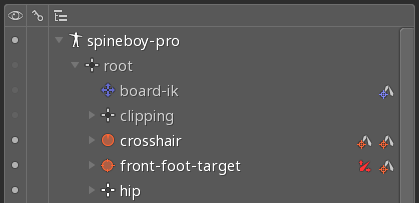
A skeleton has a hierarchy of bones and there is always a single root bone. The root bone may have child bones under it, which themselves may have child bones, etc.

Bones can be added to skins so the bones are only active when the skins are visible.
Bone transforms
Each bone has rotation, translation, scale, and shear properties which together are called the bone's "transform". A bone's transform affects its child bones. For example, translating an arm bone will also translate the hand bone.
This hierarchical inheritance of bone transforms makes manipulating images easier and more intuitive. For example, an entire skeleton can be scaled by scaling the root bone. Or, when an arm bone is rotated, the hand bone stays at the end of the arm, like you'd expect.
Bone transforms can be manipulated by the transform tools and can be keyed.
Creating bones
Some image editor scripts, such as the script for Photoshop, can create bones so when the JSON data is imported into Spine, the bones are already there.
Bones can be created using the create tool.
A bone can also be created by selecting a bone in the tree that will be the parent, then choosing New... Bone in the tree properties. The new bone will be created at the tip of the parent bone which can save you from needing to place it there manually, if that is where you need it.
Properties
Transform inheritance
Bones affected by an IK constraint cannot have their transform inheritance disabled.
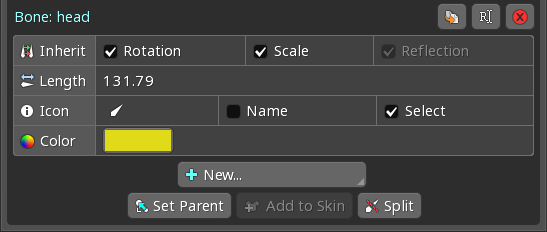
Normally transforms from parent bones affect their child bones. The Inherit checkboxes allow parts of the parent transforms to not be inherited.
RotationWhen unchecked, the bone does not rotate when parent bones are rotated. The world angle of the bone may still change if parent bones are scaled nonuniformly (meaning their X and Y scale are different).ScaleWhen unchecked, the bone does not scale when parent bones are scaled. Nonuniform scale from parent bones may still change the world angle of the bone, but the size will not change.ReflectionNormally when scale changes from positive to negative, the bone flips to point in the opposite direction. WhenReflectionis unchecked, negative scale will not cause the bone to flip.
Transform inheritance can be keyed.
Length
The bone's length can be set in bone's tree properties or via the bone length tool.
The length of a bone is cosmetic, except when using IK constraints, path constraints, or auto weights.
A zero length bone is drawn in the viewport using a crosshair icon, but is otherwise exactly the same as any other bone.
Icon
Changing the bone's icon can help differentiate bones in the tree and viewport, especially when they have zero length.
![]()
Name
When checked, the bone's name is always rendered in the viewport (if it doesn't overlap another name), even when names are not enabled. The name can be clicked to select the bone.
Select
When Select is unchecked, the bone cannot be selected in the viewport. It will still be selected in the viewport if it is selected in the tree.
This can be useful when there are many bones in a small area and some of them don't need to be selected very often.
Color
Multiple bones can be selected to set the color for all of them at the same time.
Changing the bone's color can help differentiate bones in the tree and viewport to make selection easier. For example, for a humanoid skeleton the back leg and arm can be colored differently from the front leg and arm.

Parent
A bone's parent can be changed by clicking Set Parent or pressing P, then clicking the new parent bone in the tree or viewport. A bone can also be dragged in the tree to a new parent bone, even in a different skeleton.
Add to Skin
The Add to Skin button adds the bone to the currently active skin. See skin bones for more information.
The button is disabled if no skin is currently active. The root bone cannot be added to a skin.
Split
The Split button splits a bone into a number of smaller bones. This can save time versus creating many small bones manually.

When Nested is checked, each new bone is a child of the previous bone. When unchecked, all of the new bones will have the same parent as the original bone.
When Fibonacci is checked, the length of the new bones will follow the Fibonacci sequence, meaning they get progressively smaller. When unchecked, the new bones will have equal lengths.

Separate X and Y
In animate mode, an additional row appears in the bone properties.

The Separate checkboxes allow X and Y to be keyed separately for translation, scale, or shear for the current animation. See separate X and Y keying for more information.
Hiding bones
Bones have a visibility dot in the tree. When hidden, the bone will not be drawn and cannot be selected in the viewport, though it will still be selected in the viewport if it is selected in the tree. When the bone is hidden, it will still appear in data exports and child bones and attachments are still drawn.
If you've hidden many bones or slots, ctrl+H will show them all again.
Hiding a bone is intended only for temporarily reducing clutter in the viewport and cannot be keyed. You may want to hide the attachments for all of the bone's slots and key them instead.
Right clicking a bone's visibility dot will toggle hiding the bone and all child bones and slots.
All bones can be hidden in the viewport using the viewport options.
Bone draw order
The order bones are drawn in the viewport depends on the order they were created and cannot be changed. The last bone that was created is drawn on top of the others. It is rare for the bone draw order to be important.
Attachments
It's not enough just to animate bones, we need a way to attach images and other things to the bones. This is where "attachments" come in!
Attachments are attached to bones so when the bones are transformed, the attachments are also transformed. Some attachments are visual, having images, while others are conceptual, like bounding boxes for hit detection.
However, attachments are not attached directly to a bone. Instead, attachments are grouped under a "slot" and the slot is attached to a bone. The slot controls which attachment is visible and the attachment's color. We'll explain more about slots in the next section and we'll cover attachments more thoroughly later on.