Important Note: Some of the workflows described below were necessary in older Spine runtime versions before version 3.8. Spine 3.8 and newer comes with a new and improved Skin API which allows you to setup appearance and equipment items as separate skins and combine them at runtime. Please be sure to first check out section Skins in the Spine User Guide, section Runtime Skins in the Spine Runtimes Guide, and section Combining Skins of the spine-unity documentation before continuing with the page below.
New Example Scene: The example scenes
Spine Examples/Other Examples/Mix and MatchandMix and Match Equiphave been created before this new Skin API and now demonstrate only one of multiple workflows, using Unity Sprites. The new Skin API is demonstrated in the newer example sceneMix and Match Skins.
Equips, Customization, and Mix-and-Match
Skins
Skins allow a skeleton's animations to be reused with different sets of attachments. Skins can be used for simple outfits swaps or to assemble entire characters out of many different pieces.
As a simple example, you can check out the example skeleton included in the spine-unity package named goblins in Spine Examples/Spine Skeletons/Goblins, which contains two skins. It allows you to use it as a female goblin or a male goblin. To see it in action, please check out the Spine Examples/Other Examples/Goblins example scene.
For a more sophisticated example demonstrating a mix-and-match wardrobe setup, please check out the skeleton mix-and-match in Spine Examples/Spine Skeletons/mix-and-match. It allows you to combine individual equipment and character appearance items. To see it in action, please check out the Spine Examples/Other Examples/Mix and Match Skins example scene.
Runtime Skins
Skins skins can also be created and manipulated at runtime. We call these Runtime Skins.
Combining Skins
For a mix-and-match wardrobe as used in the Mix and Match Skins example scene, you first prepare skins for each appearance and equipment item in the Spine Editor, and then at runtime combine them to a new skin. The code below shows how you first create a new Skin and then add selected item skins to it via AddSkin.
var skeletonData = skeleton.Data;
var mixAndMatchSkin = new Skin("custom-girl");
mixAndMatchSkin.AddSkin(skeletonData.FindSkin("skin-base"));
mixAndMatchSkin.AddSkin(skeletonData.FindSkin("nose/short"));
mixAndMatchSkin.AddSkin(skeletonData.FindSkin("eyelids/girly"));
mixAndMatchSkin.AddSkin(skeletonData.FindSkin("eyes/violet"));
mixAndMatchSkin.AddSkin(skeletonData.FindSkin("hair/brown"));
mixAndMatchSkin.AddSkin(skeletonData.FindSkin("clothes/hoodie-orange"));
mixAndMatchSkin.AddSkin(skeletonData.FindSkin("legs/pants-jeans"));
mixAndMatchSkin.AddSkin(skeletonData.FindSkin("accessories/bag"));
mixAndMatchSkin.AddSkin(skeletonData.FindSkin("accessories/hat-red-yellow"));
skeleton.SetSkin(mixAndMatchSkin);
skeleton.SetSlotsToSetupPose();
Changing individual attachments of a Skin
You can also programmatically set individual attachments of a skin.
Skin newSkin = new Skin("my new skin");
string visorSlotName = "googles";
string visorKey = "googles";
int visorSlotIndex = skeleton.Data.FindSlot(visorSlotName).Index;
// we set the attachment to a red visor to replace the default transparent visor
newSkin.SetAttachment(visorSlotIndex, visorKey, redVisorAttachment);
string headSlotName = "head";
string headKey = "head";
int headSlotIndex = skeleton.Data.FindSlot(headSlotName).Index;
newSkin.SetAttachment(headSlotIndex, headKey, fishHeadAttachment);
Skeleton skeleton = GetComponent<SkeletonAnimation>().Skeleton;
skeleton.SetSkin(newSkin);
skeleton.SetSlotsToSetupPose();
}
Providing Skins and Attachments
Runtime skins work best when your skeleton is animated with a template (dummy) skin in Spine. This helps avoid problems with empty slots and sharing skins between different skeletons. In Spine, make a Skin called "template" and create Skin Placeholders for all the attachments that you want to be able to customize. Use those Skin Placeholders whenever you animate attachments and attachment swaps.
The spine-unity runtime allows multiple ways of providing attachments and skins for your skeleton.
Option 1: Add variations in Spine (Prepacked variants)
Adding variations in Spine and having the variations live inside the atlas is best for when you have a limited number of customizations. It will save you the potential repacking step or issues with using multiple texture atlases.
You can use Skins and Skin Placeholders.
This can be helpful if you have a finite number of equips, and want to combine attachments in reasonable sets. For example, you want to create skins for the boots: "leather boots", "iron boots", "power boots" so they can store both the left and right boots together.
If you group your equipment or customization items into skins, you can create new skins by combining existing ones.
using System.Collections.Generic;
using UnityEngine;
using Spine;
using Spine.Unity;
using Spine.Unity.Modules.AttachmentTools; // A set of helpful extension methods for mix and match.
public class MixAndMatchExample : MonoBehaviour {
[SpineSkin] public string inspectedArmorName = "gold armor";
[SpineSkin] public string inspectedGlovesName = "red gloves";
void Combine () {
SkeletonAnimation skeletonAnimation = GetComponent<SkeletonAnimation>();
Skeleton skeleton = skeletonAnimation.skeleton;
SkeletonData skeletonData = skeleton.Data;
// Get the source skins.
var goldArmorSkin = skeletonData.FindSkin(inspectedArmorName);
var redGlovesSkin = skeletonData.FindSkin(inspectedGlovesName);
// Create a new skin, and append those skins to it.
Skin myEquipsSkin = new Skin("my new skin");
myEquipsSkin.AddSkin(goldArmorSkin);
myEquipsSkin.AddSkin(redGlovesSkin);
// Set and apply the Skin to the skeleton.
skeleton.SetSkin(myEquipsSkin);
skeleton.SetSlotsToSetupPose();
skeletonAnimation.Update(0);
}
}
You can directly assign single source attachments to slots.
This can be suitable if you have a very limited number of customizations, and don't want the hassle of managing Skins and Skin Placeholders in Spine.
using System.Collections.Generic;
using UnityEngine;
using Spine;
using Spine.Unity;
using Spine.Unity.Modules.AttachmentTools; // A set of helpful extension methods for mix and match
public class MixAndMatchExample : MonoBehaviour {
[SpineSlot] public string mouthSlotName = "mouth";
[SpineAttachment(slotField:"mouthSlotName")] public string chosenMouthName = "lipstick mouth";
[SpineSlot] public string gunSlotName = "gun";
[SpineAttachment(slotField:"gunSlotName")] public string chosenGunName = "laser pistol";
void Combine () {
SkeletonAnimation skeletonAnimation = GetComponent<SkeletonAnimation>();
Skeleton skeleton = skeletonAnimation.skeleton;
int mouthSlot = skeleton.FindSlotIndex(mouthSlotName);
int gunSlot = skeleton.FindSlotIndex(gunSlotName);
// Get the original attachments
var chosenMouth = skeleton.GetAttachment(mouthSlot, chosenMouthName);
var chosenGun = skeleton.GetAttachment(gunSlot, chosenGunName);
// Create a new skin, and add those attachments to it.
Skin newSkin = new Skin("my new skin");
newSkin.SetAttachment(mouthSlot, "mouth", chosenMouth);
newSkin.SetAttachment(gunSlot, "gun", chosenGun);
// Set and apply the Skin to the skeleton.
skeleton.SetSkin(newSkin);
skeleton.SetSlotsToSetupPose();
skeletonAnimation.Update(0);
}
}
You can use additional downloadable AtlasAssets to replace existing skins or attachments.
This is suitable for scenarios where you can't provide all atlas assets up front, e.g. when you want to download some assets on demand as DLC or content updates.
You can create additional atlases (e.g. via the Spine Texture Packer) and download and assign them to your existing skeletons via code at runtime. You don't have to use Unity Sprites when providing attachments and skins as separately downloadable resources. You can swap out existing skins with new custom ones by assigning new AtlasAssets at the SkeletonDataAsset.atlasAssets array. Alternatively you can also swap out single attachments with ones from a downloaded atlas asset, as shown in the example scene Spine Examples/Other Examples/AtlasRegionAttacher. This way you can still author them in the Spine Editor, which provides the benefit of having a precise animated preview and being able to more efficiently pack them. Alternatively, you can place a set of attachments in a folder and pack them to e.g. an equipment atlas by running the Texture Packer via the Spine command line interface (CLI).
Option 2: Use template attachments in Spine and generate Attachments from UnityEngine.Sprites in Unity.
This can be suitable if you have an arbitrarily large number of equipment and customization items, or fine-granular DLCs where downloading whole AtlasAssets is not as well-suited.
Important Note: You don't have to use Unity Sprites when providing attachments and skins as separately downloadable resources (as DLCs or content updates). You can also create additional atlases (e.g. via the Spine Texture Packer) and download and assign them to your existing skeletons, as described in the section above.
-
The first step is to create a skeleton in Spine and use a set of template images for your eventual equipment items. Those template images will need to be the right height and width, because when drawing the actual equipment images, you need to fit them into the exactly same image dimensions. If they can't all fit into one size, you may want to use more than one template. E.g. instead of just one "sword" template, you can have templates for "short sword", "wide sword", "dagger", "long sword", and so on. For best results, you should animate with those template images in Spine. Create a skin called "template" and add your template swords and armor and whatever images into Skin Placeholders. See Spine User Guide - Skins for more details.
-
The next step is to create the actual equipment/customization images with the same height and width as your template images.
After creating these individual (unpacked) images, import them into your Unity project as Sprites.
Requirements:

You can pack the Sprites using Unity's atlas packer, but they need to useFull Rectpacking mode. If you plan to use the Sprites with Premultiply Alpha (PMA) shaders or with runtime repacking (see the next section), then you will need to enable "Read/Write Enabled".
You need to know the type of shader you are using. If you are using a Premultiply Alpha shader, such as the default "Spine/Skeleton", you need to use "PMAClone" methods. More on this later. -
Then you write your C# code to combine your skin. This will vary as your equipment or character customization system depends on how your game works.
Sample Code:
using System.Collections.Generic;
using UnityEngine;
using Spine;
using Spine.Unity;
using Spine.Unity.Modules.AttachmentTools; // A set of helpful extension methods for mix and match.
public class MixAndMatchExample : MonoBehaviour {
[SpineSkin] public string templateSkinName = "template";
public Material sourceMaterial;
[Header("Gun")]
public Sprite gunSprite;
[SpineSlot] public string gunSlot;
[SpineAttachment(slotField:"gunSlot", skinField:"templateSkinName")] public string gunKey = "gun";
void Combine () {
SkeletonAnimation skeletonAnimation = GetComponent<SkeletonAnimation>();
Skeleton skeleton = skeletonAnimation.skeleton;
SkeletonData skeletonData = skeleton.Data;
// Get the template skin.
Skin templateSkin = skeletonData.FindSkin(templateSkinName);
// Prepare the custom skin.
Skin currentEquipsSkin = new Skin("my custom skin");
// Get the gun
int gunSlotIndex = skeleton.FindSlotIndex(gunSlot);
Attachment templateGun = templateSkin.GetAttachment(gunSlotIndex, gunKey);
// Clone the template gun Attachment, and map the sprite onto it.
// This sample uses the sprite and material set in the inspector.
Attachment newGun = templateGun.GetRemappedClone(gunSprite, sourceMaterial); // This has some optional parameters. See below.
//Attachment newGun = templateGun.GetRemappedClone(gunSprite, sourceMaterial, premultiplyAlpha: true, cloneMeshAsLinked: true, useOriginalRegionSize: false); // (Full signature.)
// Add the gun to your new custom skin.
if (newGun != null) currentEquipsSkin.SetAttachment(gunSlotIndex, gunKey, newGun);
// Set and apply the Skin to the skeleton.
skeleton.SetSkin(currentEquipsSkin);
skeleton.SetSlotsToSetupPose();
skeletonAnimation.Update(0);
}
}
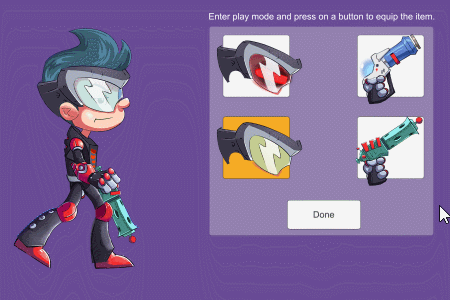
Check out the
Spine Examples/Other Examples/Mix and Matchexample scene and theMixAndMatch.cssample script that comes with the spine-unity unitypackage to see the code in action.
Runtime Repacking
A Skin is a collection of Attachments, and the slots and names mapped to them. The Repacking utility creates a copy of the skin and all the attachments inside it that map to a new single repacked texture.
A Material is required for the utility method to generate a new Material used to render the new attachments.
The method will also output references to the new material and new texture it generated.
// add some attachments to runtime skin here..
Skin repackedSkin = runtimeSkin.GetRepackedSkin("Repacked skin", materialTemplate, out runtimeMaterial, out runtimeAtlas);
Repacking works as follows:
- Collect all of the Attachments in a skin, getting their texture sources and coordinates.
- Use Unity's runtime texture packer to repack those into a new single texture. We can call this the "repacked texture"
- Make clones of all the original attachments and mapping them onto the new texture.
- Return a new Skin populated by those clones that use the repacked texture.
Requirements
If you plan to use these Sprites with Premultiply Alpha (PMA) shaders or with runtime repacking (see the next section), then you will need to use "Read/Write Enabled".
See the
Spine Examples/Other Examples/Mix and Matchexample scene and theMixAndMatch.cssample script that comes with the spine-unity unitypackage for implementation sample.
Caching behavior The repacking process generates intermediary textures that are pulled from original textures, which are cached to prevent runaway texture allocations with multiple subsequent repack operations. At the point in your code's execution when you expect your execution to no longer be followed by multiple repack operations, you can clear the cache by calling AtlasUtilities.ClearCache.
// multiple repacks.
//...
AtlasUtilities.ClearCache();